What's inside
As an Amazon Associate I earn from qualifying purchases. This post may contain affiliate links at no extra cost to you.
Sections
Our Top Picks
 IRWIN 10503419 MS750 High-Impact Chisel SetSet of 312.6 x 1.54 x 6.14 inches2.1 poundsCheck on Amazon


Choosing the Right Chisel for Site Repairs
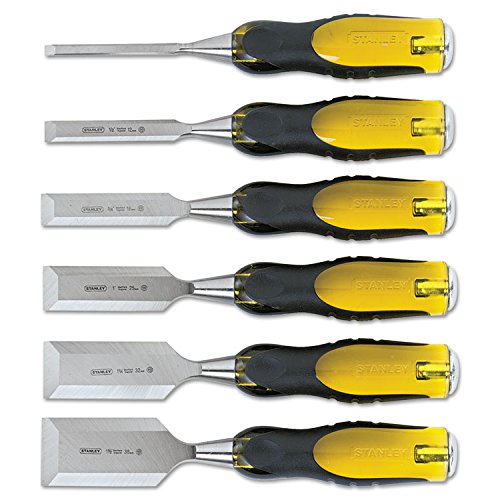
Bench chisels and framing chisels both remove wood, but they are built for different jobs. A bench chisel is the general-purpose option: relatively slim, easy to control, and suited to cleaning joints, paring shoulders, trimming plugs, and fitting hardware. A framing chisel is a heavier demolition and joinery tool, intended for chopping deep mortises, splitting waste, levering apart joints, and working around rough framing.
For a typical repair kit, the sensible choice is not necessarily one or the other. A 1/2-inch or 3/4-inch bench chisel handles most careful repair work, while a 1-inch framing chisel earns its space when the job involves old nails, swollen joints, deep notches, or forceful chopping. The wrong choice usually fails through poor control rather than lack of cutting power.
As an Amazon Associate we earn from qualifying purchases at no extra cost to you.



Where Bench Chisels Work Best
Bench chisels have blades commonly ranging from about 1/4 inch to 1-1/2 inches wide. Their thinner blades enter narrow joints and remove small amounts of material without tearing out large sections of sound wood. The bevel is normally on both sides, which makes the tool predictable for chopping and useful for paring when held carefully.
Use a bench chisel for cleaning a mortise, trimming a door hinge recess, squaring a notch, removing squeezed-out glue, or fitting a replacement piece. It is also the better tool for marking out a repair that must remain visually clean. A sharp 3/4-inch chisel can remove a controlled shaving; a heavy framing chisel may take a gouge.
Bench chisels are often supplied with wooden handles and a metal hoop, or with impact-resistant plastic handles. A hooped handle tolerates mallet blows, but a lightweight bench chisel is not indestructible. Striking the handle with a steel hammer can mushroom the hoop, split the handle, or drive the blade through the work unexpectedly. Use a wooden or soft-faced mallet unless the manufacturer specifically permits harder impacts.
If your site kit needs a practical starting point, a bench chisel set covering 1/4, 1/2, 3/4, and 1 inch is more useful than buying a large set with every size. Cheap sets are acceptable for occasional hinge and trim work, provided the backs are reasonably flat and the handles do not loosen.
Where Framing Chisels Earn Their Weight
Framing chisels are wider, thicker, and usually longer than bench chisels. Many have a bevel on one side and a flat back, with a substantial handle designed for repeated mallet or hammer blows. The blade can be driven through framing timber, used to split waste along the grain, or tapped sideways to open a joint.
They are useful for repairing mortise-and-tenon joints, chopping beam pockets, removing damaged stud sections, cutting deep hinge-side notches, and breaking apart nailed timber. The thick blade is less likely to bend when it meets a hidden nail or a knot. That does not make it safe to strike blindly: a nail can chip the edge, deflect the tool, or send a sharp fragment into the work area.
A framing chisel is also better for controlled levering, but “controlled” matters. It can pry a small piece of waste from a mortise or separate a glued joint after the surrounding material has been cut. It should not replace a pry bar. Levering hard against the edge can roll or chip it, and forcing the blade sideways can split a sound stile or stud.
For occasional heavy repair work, one good 1-inch framing chisel is usually enough. A 1-1/2-inch version removes more waste but is tiring in confined spaces. Larger chisels make sense for timber framing or regular structural carpentry, not for a tool belt that mainly handles doors, trim, and cabinetry.
Bench Chisel vs Framing Chisel
| Feature | Bench chisel | Framing chisel |
|---|---|---|
| Typical sizes | 1/4 to 1-1/2 inches | 3/4 to 2 inches |
| Best use | Fitting, paring, trim, hardware, light joinery | Deep chopping, rough joinery, splitting and demolition |
| Control | High; removes small amounts accurately | Lower; removes material quickly but aggressively |
| Impact tolerance | Moderate, depending on handle | High when used with a proper mallet or hammer |
| Portability | Easy to carry several sizes | Heavier; usually one or two sizes are carried |
| Main failure mode | Chipped edge, bent blade, split handle | Rolled edge, damaged bevel, excessive wood removal |
Using Either Chisel Without Damaging the Work
Start by cutting the repair boundary with a knife, marking gauge, or saw. On a hinge recess, for example, score the outline to the required depth, then make a series of cross-grain cuts roughly 1/8 inch apart. Remove the waste with the bevel facing down for controlled depth. Do not try to chop the full recess in one blow.
For a deep mortise or notch, drill out some waste first. Overlapping holes with a bit slightly smaller than the mortise reduce impact load and leave the chisel to square the sides. Keep the first cuts 1/16 to 1/8 inch inside the layout lines, then pare to the line. This prevents a single overcut from enlarging the finished repair.
Always inspect for nails, screws, staples, and embedded grit before chopping. If metal is likely, use a nail set, pliers, or an oscillating tool to clear it first. Wear eye protection, clamp the work securely, and keep your supporting hand behind the cutting edge rather than in front of it.
Sharpness, Maintenance, and Site Storage
A sharp chisel is safer because it needs less force and is less likely to glance. For general site work, a 25-degree primary bevel with a small 30-degree secondary bevel is a practical compromise. Hone the edge when it begins to crush fibers instead of slicing them. A 1,000- to 4,000-grit sharpening progression is sufficient for most carpentry repairs; polishing beyond that is optional.
Protect the edge with a cap or roll when the chisel is in a tool belt. Do not drop chisels loose into a pouch with screws and nails. Wipe off wet framing dust, adhesive, and treated-wood residue, then apply a thin coat of rust preventive to the blade. A chipped edge can often be ground back, but repeated overheating during grinding will soften the steel near the cutting edge.
A Practical Buying Decision
Choose bench chisels if your repairs are mainly doors, windows, trim, cabinets, hinge plates, and small joinery. Choose a framing chisel if you regularly chop deep pockets, repair heavy timber, split nailed joints, or work on rough framing where a slim blade is likely to bend.
If funds are limited, buy one decent 3/4-inch bench chisel and sharpen it properly before buying more. Add a heavy-duty framing chisel only when your work actually requires repeated heavy blows. A basic chisel roll tool holder is also worthwhile on site: it keeps sharp edges covered and prevents the cheap but common damage caused by loose tools rubbing together.