What's inside
As an Amazon Associate I earn from qualifying purchases. This post may contain affiliate links at no extra cost to you.
Sections
Our Top Picks
 1-1/2" Robert Sorby #285 Timber Framing ChiselOnesize19.5 x 1.5 x 0.1 inches1.5 poundsCheck on Amazon


What Makes a Framing Chisel Different
A framing chisel is not just a bigger bench chisel. It is a chisel designed to be hit hard, levered hard, and used to pare and chop across grain in large timbers. For heavy notching on site — birdsmouths, post notches, housing joints, brace pockets — you need length, mass, and an edge that survives hitting knots and occasional grit.
Typical framing chisels run 15 to 17 inches overall, with 5 to 6 inch blades and 1 to 2 inch widths. The extra length gives you two-handed control for paring and the leverage to pry out cheeks. Weight is usually 1.2 to 1.8 lb. That mass matters when you are chopping a 1-1/2 inch deep seat cut in Douglas fir 20 feet in the air and you cannot get a good swing.
As an Amazon Associate we earn from qualifying purchases at no extra cost to you.

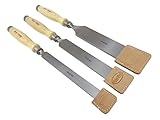


Bench chisels fail here in two predictable ways: thin tangs bend or snap when you lever, and short, light blades chatter instead of cutting when you pare end grain. Mortise chisels are tough but too thick and narrow to clean a wide notch bottom efficiently. A proper framing chisel sits in the middle — thick enough to lever, wide enough to register flat.
Blade Width and Geometry for Notching
For site notching, one chisel does not do everything. Most timber framers and heavy formwork carpenters carry one primary size and consider a second.
1-1/2 inch is the workhorse for 2x material and post notches. It spans wide enough to clean a joist seat in two or three passes but is still narrow enough to chop the shoulders. 2 inch is faster for cleaning large housing bottoms and for paring wide, flat surfaces like a 6×6 post face, but it is harder to control when chopping across grain and it wedges tighter in deep cuts. 1 inch is useful for narrow brace housings and for cleaning corners where a wider blade cannot reach.
Look for a blade that is laminated or has a relatively flat primary bevel of 25 degrees with a secondary micro-bevel of 30 to 32 degrees. That 30+ degree edge holds up to mallet blows in seasoned SPF and oak without folding. A 25-degree single bevel cuts easier but will roll or chip when you hit a hidden nail or staple — common on remodel and deck work. Blade sides should be slightly beveled or straight with eased edges; fully bevel-edged bench chisels look nice but reduce the flat registration you need to pare a notch bottom true.
Thickness at the shoulder should be around 5/16 to 3/8 inch. Thinner blades flex when you lever a chip free. Much thicker and you will fight to start the cut, especially in hardwood.
Socket vs. Tang on Site
For heavy site use, socket construction is more durable than tang. A socket distributes impact load around the handle and can be re-handled in minutes if the handle splits. A tanged chisel with a bolster can be excellent, but a heavy miss with a steel hammer or a long pry will eventually loosen or bend the tang.
Handles tell you a lot. Traditional framing chisels use a turned hardwood handle — hickory, ash, or hornbeam — with a steel hoop at the top and a leather washer or steel ferrule at the socket. The hoop prevents mushrooming from a mallet; without it, the end splinters within a week of site use. Plastic-handled framing chisels with steel striking caps solve this but transmit more vibration and cannot be easily replaced.
If you hit your chisels with a steel framing hammer, which many carpenters do despite the advice, you must have a hooped wooden handle or a steel cap. Un-hooped handles will split on the second day. If you use a wooden mallet or dead-blow, a standard hooped handle will last years.
Length matters for safety: avoid framing chisels under 14 inches for notching. Short handles put your holding hand too close to the edge when paring toward yourself on a post.
Steel and Edge Holding
Most good framing chisels today are Cr-V or high-carbon steel hardened to 58-61 HRC. Very hard steel (62+ HRC) holds an edge longer in clean wood but is brittle — it chips instead of rolling when you hit grit, and it is miserable to resharpen on site with a coarse diamond stone. Slightly softer steel at 58-59 HRC dulls faster but can be touched up in two minutes and is less likely to chip out a 1/16 inch divot that takes 15 minutes to grind out.
For site notching, toughness beats ultimate edge retention. You will be cutting dirty timber, plywood formwork with sand on it, and pressure-treated material that is abrasive. Expect to hone every 30 to 60 minutes of continuous notching. Carry a coarse/fine diamond sharpening stone in your tool belt and touch up before the edge is truly dull. Cutting with a dull chisel requires more force, which is when slips happen.
Laminated Japanese-style framing chisels (hard steel edge forge-welded to softer body) take an exceptionally keen edge and are easy to flatten, but the hard layer can chip if you pry sideways with the edge engaged. Western socket chisels are more forgiving of prying.
Comparison: What to Carry for Site Notching
There is no perfect one-chisel kit. This is how the common options trade off for heavy notching rather than fine joinery:
| Chisel Type | Best For | Weakness on Site | Weight / Length |
|---|---|---|---|
| 1-1/2″ Socket Framing Chisel | All-around notching, joist seats, post notches in 2x and 4x | Slow for 5-1/2″ wide housings | 1.4-1.6 lb / 15-16″ |
| 2″ Socket Framing Chisel | Cleaning wide pocket bottoms, paring large post faces | Hard to start chops, wedges in deep cuts | 1.6-1.8 lb / 16-17″ |
| 1″ Framing / Heavy Mortise Chisel | Narrow brace housings, corner cleanup, hinge gains | Too narrow to flatten a full notch efficiently | 1.2-1.4 lb / 14-15″ |
| Slick (2″ – 3″ Push Chisel) | Paring long, flat notches with two hands, timber frame finish work | Not for mallet work; too long and fragile to hit | 2.0-2.5 lb / 20-30″ |
If you can only buy one, get a 1-1/2 inch socket framing chisel with a hooped handle. It will handle 80 percent of notching tasks from deck beams to rafter seats. Add a 2 inch later if you regularly notch 6x material or clean wide ledgers. A dedicated slick is only worth carrying if you cut full timber frame joints on sawhorses; on a ladder or scaffold it is awkward and dangerous to use.
When shopping, look for socket framing chisels rather than tang, and check that replacement handles are available for the brand. Being able to swap a handle for $15 is cheaper than buying a new $80 to $120 chisel after a handle splits on a cold morning.
Using It on Site Without Wrecking It
Heavy notching is part sawing, part chopping. Cut the shoulders with a saw to depth, make relief cuts every 3/4 to 1 inch across the waste, then chop and lever. Never try to chop the full depth in one blow — the chisel wedges, you lever sideways with the edge buried, and the corner chips.
Keep the flat back truly flat. On a new chisel, spend 20 minutes lapping the back on 120 then 400 grit until the last inch is polished. Without a flat back, you cannot pare a notch bottom flat and you will chase the cut forever. After that, you only need to maintain the bevel.
On site, two failure modes account for most damage: prying with the bevel down and twisting to pop a chip, and hitting a chisel that is not seated squarely, which loads the corner and fractures it. Lever with the flat side down and pry straight back. If the chip will not pop, make another relief cut instead of twisting.
Storage matters in a busy kit. A simple blade guard made from a split piece of rubber hose prevents edge dings in your carpenter tool belt and keeps you from reaching for a razor edge blindly. Do not store it loose with hammers and pry bars.
When the Cheaper Option Is Fine
You do not need a $180 hand-forged chisel to notch SPF joists. A $50 to $80 Cr-V socket framing chisel from a reputable toolmaker will perform identically on softwood if the back is flat and the edge is properly ground. Where extra money helps is handle quality, steel consistency, and flatness out of the box — cheaper chisels often need more initial lapping and may have a hoop that loosens.
For occasional notching — a few deck beams a month — a single mid-range 1-1/2 inch chisel and a decent diamond plate will outlast your need. For daily heavy timber or formwork notching, spend more for a chisel you can re-handle and that holds a 30-degree micro-bevel without chipping. The productivity gain is not in cutting speed but in fewer resharpening stops and less risk of edge failure when you are behind schedule and tempted to force the cut.
Avoid sets. Three cheap framing chisels for the price of one good one usually means three soft, thin, or poorly heat-treated blades that will not hold up to levering. Buy one good size, learn to keep it sharp, then expand only when you hit a task it truly cannot do.