What's inside
As an Amazon Associate I earn from qualifying purchases. This post may contain affiliate links at no extra cost to you.
Sections
Our Top Picks


Start with the work, not the pocket count
A useful measuring-and-marking setup keeps the tools you reach for repeatedly close at hand without turning your belt into a heavy, snag-prone toolbox. For trim and cabinet work, that usually means a tape, pencil, marking knife, and a reliable place for a square. Framing and layout work may call for a longer tape and a different way to carry a square. There is no single best arrangement: the right one depends on how often you measure, whether you climb, and how much of the job involves kneeling or moving through tight spaces.
Start with the tools you actually use over half a day. Carrying three rarely used marking tools “just in case” adds weight and makes it harder to find the one you need. Put the tape and pencil on your dominant-hand side, then arrange less-used items so they do not interfere with drawing the tape or reaching a plane or chisel elsewhere on the belt.
As an Amazon Associate we earn from qualifying purchases at no extra cost to you.


A practical basic setup
For general carpentry, a sturdy belt or compact pouch can carry a 16- or 25-foot tape, two pencils, a marking knife, and a small combination square or folding rule. A 16-foot tape is lighter and easier to manage for furniture, cabinets, and interior trim. A 25-foot tape is more useful for room dimensions and longer stock. If you mostly work alone, a tape with a usable standout can help with longer measurements, but do not assume the printed maximum is what you can hold reliably. Test it before buying.
Keep pencils in a narrow sleeve rather than a deep pocket where they can catch on other tools. A second pencil is cheap insurance; a snapped point or missing pencil should not stop layout. Store a marking knife in a dedicated sheath or guarded slot. An exposed blade can cut a hand when you reach into the pouch, and a knife loose beside the tape hook can damage the tape.
A small carpenter tool belt pouch is often enough for this kit. Look for a tape clip that fits your actual tape, a pencil sleeve you can reach with either hand, and pockets deep enough to retain tools when you bend. More pockets are not automatically better: oversized pouches tend to collect fasteners, scraps, and tools you do not need.
Choose the right carry for the job
A belt works well when measurements and marks happen constantly and you need both hands free. It is less appealing for long periods of ladder work, crawling into cabinets, or moving through finished interiors where a bulky pouch can scrape surfaces. For occasional layout, a tape clipped to a pocket and a pencil in a small sleeve may be simpler than wearing a full belt.
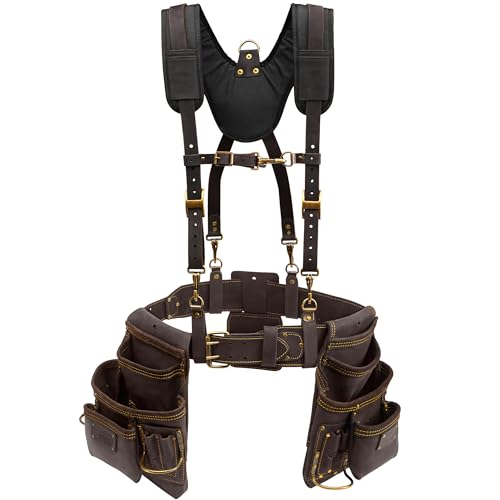
Suspender-style support can make sense when a loaded belt pulls down on your hips, especially if you carry other hand tools as well. The trade-off is extra bulk and straps that can snag or feel hot. Before adding suspenders, remove duplicate tools and unnecessary hardware. A tape, square, and marking kit should not weigh as much as a full framing load.
Compare common setups
| Setup | Best for | Trade-off |
|---|---|---|
| Pocket clip and pencil sleeve | Light layout, occasional measuring | Fast and unobtrusive, but offers little storage or tool protection |
| Compact pouch on a belt | Trim, cabinetry, general site work | Keeps several tools ready; can swing or snag if overloaded |
| Full carpenter belt with suspenders | Long days with measuring plus other tools | Better load support, but more weight, bulk, and adjustment |
| Apron or bench-side kit | Shop work and repeated marking at a bench | Comfortable for stationary work; poor choice for ladders and frequent travel |
Store squares and marking tools safely
A combination square is handy for checking short distances, setting a line at 90 degrees, and marking repeat offsets. It is also awkward if its head sticks out of a pouch and catches on doorways or stock. Check that the pouch holds the tool below the rim or has a retaining strap. For longer, repeated layout lines, a folding rule or a straightedge carried separately may be more practical than trying to force a large square into a compact pouch.
A marking knife earns its place when a fine, clean reference line matters, such as fitting a joint or trimming to a scribed line. A carpenter’s pencil is faster for rough cuts and visible marks on lumber. Carrying both is sensible; expecting one to replace the other is not. A combination square and marking knife with a sheath are useful additions when your work calls for their accuracy, but they are not required on every job.
Fit and test before buying
Pocket dimensions on a product listing tell only part of the story. Bring your tape and square to a store, or check measurements against the tools you own. A pocket that is 2 inches wide may still be too tight if its seams reduce the opening. Test whether you can return the tape to its clip one-handed, draw a pencil without looking, and reach the marking knife without brushing its edge.
Then load the belt and try ordinary movements: bend to pick something up, kneel, climb a step ladder, and turn through a doorway. If tools fall out when you crouch, the pockets are too shallow or the layout is wrong. If the pouch hits your thigh, move it toward the hip or reduce its load. A belt that feels acceptable standing still can become irritating after an hour of walking.
Where to save—and where not to
A basic nylon pouch is fine for occasional DIY work and light trim. You do not need premium leather or a large modular system to carry a tape and two pencils. Spend more only when the seams, clips, or belt fit are failing under regular use. The cheapest pouch becomes poor value if a worn tape clip drops a tool onto a finished floor or if a loose pencil pocket repeatedly spills its contents.
Whatever setup you choose, inspect the stitching and belt attachment before loading it. Keep sharp tools covered, clear sawdust from pockets, and remove metal offcuts that can scratch a tape blade. A compact, predictable kit is easier to work from than a larger belt full of duplicates—and easier to tailor when the job changes.