What's inside
As an Amazon Associate I earn from qualifying purchases. This post may contain affiliate links at no extra cost to you.
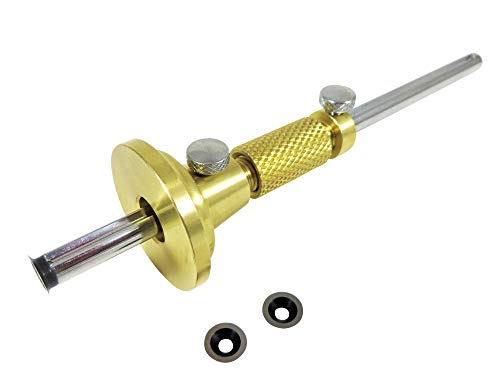
A cutting gauge scores a line parallel to an edge. Its knife severs fibres before a chisel, plane or saw gets there, helping prevent torn veneer and ragged shoulders in solid timber. The best choice depends less on brand than on the work: a sharp, well-adjusted cutter and a fence that stays square matter more than extra features.
As an Amazon Associate we earn from qualifying purchases at no extra cost to you.


Sections
Our Top Picks

Choose by the work
For occasional joinery and general layout, a traditional single-knife gauge is usually enough. For veneer, cross-grain shoulders or repeated fine marking, a gauge with a replaceable cutter or a wheel-style cutter can be easier to control. A double-rod mortise gauge is a different tool: it marks two parallel lines and is useful for mortises, but is not the best all-purpose choice for a single clean line.
Before buying, check the fence size and how securely the stem locks. A broad fence registers more steadily against a board edge; a short fence is easier to use in tight spots. If you often mark stock wider than the gauge’s reach, look for a long stem or plan to use a ruler and knife instead.
Cutting gauge types compared
| Type | Best for | Trade-off |
|---|---|---|
| Traditional pin or knife gauge | Everyday layout in solid wood | Simple and affordable, but the cutter may need sharpening and careful setup |
| Wheel cutter gauge | Fine lines and cross-grain scoring | Usually tracks cleanly, though a small cutter can be harder to sharpen or replace |
| Replaceable-blade gauge | Frequent use or users who prefer swapping blades | Convenient, but replacement blades add ongoing cost |
| Mortise gauge | Marking two lines for a mortise or tenon | More versatile for paired lines, but bulkier for simple edge marking |
What to look for when buying
Cutter and adjustment: The cutting edge should be replaceable or accessible for sharpening. It must sit firmly without rocking. A cutter that shifts under pressure can leave a doubled line or wander across the face. Check that the locking screw is easy to tighten by hand and does not bear directly on a delicate stem in a way that dents it.
Fence and stem: The fence should slide without binding and lock without twisting. Hold it against a straight board edge and apply light sideways pressure; any play can show up as a wandering score. Wooden gauges can be excellent, but wood may swell or shrink with humidity. Metal-bodied gauges tend to stay dimensionally stable, though they can feel heavier and cost more.
Blade choice: A thin knife makes a fine, controllable score; a thicker cutter can be more robust but may wedge fibres apart. For veneer, avoid forcing a deep cut in one pass. A sharp cutter and two or three light passes are safer than one heavy stroke. For a basic, low-cost starting point, a traditional woodworking cutting gauge is often sufficient.
How to score clean lines
First sharpen the cutter if it drags or crushes fibres. Set the gauge from the reference edge with a ruler, then lock it and check the distance at both ends of the fence. Mark a test line on scrap from the same stock. A typical fine layout line is around 0.3–0.5 mm wide; if yours is much broader, the cutter may be dull, the setting loose, or the gauge tilted.
Keep the fence flat against the edge and pull the gauge toward you in a controlled stroke. Start with light pressure to establish the track, then make another pass only if the line needs more depth. For veneer, score with the grain where practical and use a backing board when cutting through. A deep score across brittle veneer can lift the surface ahead of the cutter; several shallow passes reduce that risk.
When marking across end grain, the cutter may follow the fibres rather than the intended direction. Make the score from both edges toward the middle, or pare to the line with a sharp chisel. On long boards, keep the fence in contact throughout. If it tips over a knot or damaged edge, stop and reset rather than dragging through and accepting a crooked mark.
Practical picks by user
For a first gauge used on furniture and general shop work, choose a straightforward single-cutter model with a stable fence and a cutter you can sharpen. An inexpensive gauge is fine if the lock holds securely and the stem slides smoothly. Spend more only if you need finer adjustment, a more durable body or a cutter system that suits frequent use.
If veneer and cross-grain work are regular jobs, consider a wheel-style cutting gauge. Its rolling cutter can start a neat line with less tendency to skate, but it still needs a sharp edge and a steady fence. For paired layout lines on mortises, a mortise gauge is the better tool; don’t buy one just to mark occasional single lines.
Care and common mistakes
Brush dust from the stem and fence, and store the cutter with its edge protected. A burr on the fence can scratch a board or stop the gauge from seating flat. If the line changes width along its length, inspect the cutter for a nick and check that the locking screw has not loosened. If the line is straight but too deep, reduce pressure rather than changing the gauge setting.
A cutting gauge is a layout tool, not a substitute for checking stock. Confirm the reference edge is straight and the board is square where the line will be used. On expensive veneer, test the setup on an offcut first; a clean score saves time only when it is in the right place.