What's inside
- Choose the belt material first
- Size the belt for your working waist
- Match pocket layout to the work
- Plan hammer and fastener storage separately
- Balance the load before adding capacity
- When suspenders are worth buying
- Decision matrix for first-time buyers
- Durability, cleaning, and ownership costs
- Final buying checklist
- Related Guides
- Choose the belt material first
- Size the belt for your working waist
- Match pocket layout to the work
- Plan hammer and fastener storage separately
- Balance the load before adding capacity
- When suspenders are worth buying
- Decision matrix for first-time buyers
- Durability, cleaning, and ownership costs
- Final buying checklist
- Related Guides
As an Amazon Associate I earn from qualifying purchases. This post may contain affiliate links at no extra cost to you.
The best tool belt for a beginner is a comfortable, adjustable belt with 4–8 practical pockets, separate hammer and fastener storage, and enough capacity for the project you actually do—not the largest belt you can buy.
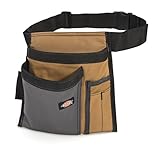
This tool belt buying guide for beginners focuses on the decisions that affect daily use: material, fit, pocket layout, weight distribution, suspenders, and project-specific capacity. A well-chosen belt keeps essential tools accessible without turning a short repair into a heavy, awkward carry.
As an Amazon Associate we earn from qualifying purchases at no extra cost to you.


Sections
- Choose the belt material first
- Size the belt for your working waist
- Match pocket layout to the work
- Plan hammer and fastener storage separately
- Balance the load before adding capacity
- When suspenders are worth buying
- Decision matrix for first-time buyers
- Durability, cleaning, and ownership costs
- Final buying checklist
- Related Guides
Choose the belt material first
Material affects durability, weight, flexibility, weather resistance, and price. There is no universally best option; the right choice depends on how often you work and where the belt will be used.
| Material | Typical empty weight | Best for | Main advantages | Trade-offs |
|---|---|---|---|---|
| Nylon or polyester | 1.5–3 lb | Occasional repairs, DIY, light framing | Light, flexible, often affordable, dries quickly | Fabric can fray or sag under heavy loads |
| Oil-tanned leather | 2.5–5 lb | Frequent carpentry and remodeling | Resists abrasion, becomes more comfortable with use | Heavier, requires conditioning, costs more |
| Full-grain leather | 3–6 lb | Heavy-duty professional work | Excellent abrasion resistance and long service life | Stiff initially and usually the most expensive |
| Hybrid fabric-leather | 2–4 lb | Users wanting structure without maximum weight | Reinforced wear areas with a lighter main body | Stitching and rivets become important failure points |
For occasional home maintenance, nylon or polyester is usually the sensible starting point. Choose leather when the belt will be worn several times a week, dragged against unfinished lumber, or loaded with heavier hand tools. A padded fabric belt can be comfortable, but padding is not a substitute for a rigid, properly fitting waist section.
Size the belt for your working waist
Do not choose a size from your pants label alone. Measure around the area where the belt will sit while wearing the trousers and work clothing you normally use. A tape should touch the body without compressing it.
Look for a usable adjustment range that places your measurement near the middle, rather than at the smallest or largest setting. For example, if your working waist is 36 inches, a belt adjustable from 30–46 inches gives useful room for seasonal clothing and layering. A 34–38-inch belt may fit initially but leave little adjustment.
- Leave roughly 2–4 inches of adjustment beyond your normal measurement in both directions.
- Check that the buckle or fastening system does not press into your hip when bending.
- Try the belt with a loaded pouch; an empty belt can hide slipping and pressure points.
- For belts with separate pouches, confirm that the pouch attachment system fits the belt width.
Match pocket layout to the work
Pocket count is less important than pocket placement. Beginners often buy a belt with many compartments and then carry duplicates, loose hardware, and tools they never use. Start with a layout that supports your dominant hand and keeps bulky items away from your hip joint.
For general home repairs
A compact 4–6-pocket setup is enough for a tape measure, pencil, utility knife, small screwdriver, pliers, and a few fasteners. Add one narrow slot for a bit driver or small pry tool. This arrangement stays light and works for shelves, trim, picture hanging, and routine maintenance.
For trim and finish work
Choose several narrow, open-topped pockets rather than deep bags. You need quick access to a pencil, marking knife, tape measure, nail set, small pliers, and a compact fastener pouch. Deep pockets can trap small finish nails and make them difficult to retrieve without looking.
For framing and structural work
Use larger, reinforced pouches with separate zones for nails or screws. A framing setup often carries a tape measure, speed square, pencil, hammer, utility knife, pry bar, pliers, and multiple fastener sizes. This is where suspenders and a wider padded belt become valuable.
Plan hammer and fastener storage separately
A hammer loop should hold the tool securely but allow it to slide out without twisting your torso. A steel loop is durable and handles a heavier framing hammer; a fabric loop is lighter and quieter but may wear sooner. Position the hammer on your non-dominant side so your dominant hand can reach it naturally.
Fasteners deserve more attention than a single large pocket. Separate nails, screws, and specialty hardware whenever possible. Mixing them creates wasted time and encourages overfilling. Useful features include:
- A dedicated nail or screw pocket with a reinforced opening.
- A smaller compartment for short screws or finish nails.
- A closed section for sharp bits, blades, or loose hardware.
- A flat pocket that prevents a tape measure or square from disappearing under fasteners.
For occasional repairs, carry only one small container of the fastener size currently needed. For framing, capacity for approximately 1–2 pounds of fasteners per side is more practical, but the total load should still be balanced across both hips.
Balance the load before adding capacity
Weight distribution matters more than the belt’s empty weight. A belt loaded to 12 pounds can feel manageable when tools are spread across both sides, but uncomfortable when nearly everything hangs from one hip.
Place frequently used light tools toward the front-side area and heavier tools near the back of each hip. Keep the hammer opposite your dominant hand and place the main fastener pouch close enough to reach without leaning. Avoid stacking two heavy pouches on one side.
Use this simple setup calculation:
- Belt and pouches: 3 pounds
- Hammer: 2 pounds
- Tape measure, square, knife, pliers, and driver: 3 pounds
- Fasteners: 2 pounds
- Total working load: 10 pounds
If that 10-pound load causes the belt to sag or your shoulders and hips feel uneven, the solution is not automatically a larger belt. Remove duplicate tools, split fasteners between sides, or add suspenders.
When suspenders are worth buying
Suspenders transfer some load from the waist to the shoulders and help keep a loaded belt from sliding down. They are particularly useful when the belt carries more than about 8–10 pounds, when you climb ladders frequently, or when your waist shape makes a belt prone to slipping.
Look for wide, adjustable shoulder straps, breathable contact areas, and attachment points that do not interfere with your pouch layout. A rear crosspiece helps stabilize the system. Suspenders should support the belt, not pull it tightly upward; adjust the waist belt first, then shorten the shoulder straps until the load is stable.
For a light DIY belt under 6 pounds, suspenders may add unnecessary bulk. For framing, roofing, decking, or all-day remodeling, they can improve comfort and reduce the temptation to overload one pouch.
Decision matrix for first-time buyers
| Your situation | Recommended setup | Target capacity | Why |
|---|---|---|---|
| Budget-conscious, occasional use | Nylon or polyester belt with 4–6 pockets | 4–7 lb of tools | Low initial cost and sufficient capacity for repairs |
| Weekend DIY and remodeling | Padded fabric or hybrid belt with 6–8 pockets | 6–10 lb of tools | More structure and organization without full professional weight |
| Frequent carpentry | Leather or reinforced hybrid belt with suspenders | 8–14 lb of tools | Better abrasion resistance and load stability |
| Small workspace or ladder work | Compact modular pouch system | 3–6 lb of tools | Less bulk and easier movement through tight areas |
| Dedicated framing or deck projects | Wide belt, large pouches, steel hammer loop, optional suspenders | 10–16 lb of tools | Supports larger tools and multiple fastener types |
Durability, cleaning, and ownership costs
The first parts to wear are usually pocket openings, belt edges, stitching near hammer loops, rivets, and the attachment points on modular pouches. Before buying, inspect reinforcement stitching and check whether the pouch mouth remains open when empty. A pocket that collapses may be durable but frustrating to use.
Brush sawdust and grit out after each project. Fabric belts can usually be spot-cleaned with mild soap and water, then air-dried completely. Avoid storing damp nylon in a closed toolbox. Wipe leather with a dry cloth and apply a suitable leather conditioner sparingly; excessive oil can soften pocket structure and attract dirt. Do not machine-wash leather.
Replace damaged fastener pouches and worn hammer loops before they fail on a ladder. If a belt costs $80 and is used 80 times over four years, its ownership cost is about $1 per use. A cheaper belt that needs replacement after 20 uses may cost more over the same period, especially if it causes tools or fasteners to be lost.
Final buying checklist
- Measure your working waist with normal clothing.
- Choose material according to frequency, abrasion, and weather exposure.
- Count the tools for your main project instead of buying maximum capacity.
- Separate hammer storage from nails, screws, and small hardware.
- Distribute heavy items across both hips.
- Add suspenders when the loaded belt approaches 8–10 pounds or begins to slip.
- Check stitching, rivets, pocket openings, and pouch compatibility.
- Leave unused pockets empty; a lighter belt is usually a more useful belt.
For most beginners, the safest starting point is a medium-width nylon or hybrid belt with adjustable sizing, one hammer loop, two general-purpose pouches, a dedicated fastener pocket, and room for six to eight essential tools. Upgrade to leather, larger pouches, or suspenders only when your projects and actual working load justify them.