What's inside
As an Amazon Associate I earn from qualifying purchases. This post may contain affiliate links at no extra cost to you.
A wheel marking gauge uses a small cutting wheel to score a line parallel to a board’s edge. Unlike a pin-style gauge, it tends to cut cleanly across grain and is less likely to follow the grain off course. That makes it useful for laying out joints, setting shoulders, and marking consistent offsets on furniture and cabinet work.
The best choice depends less on brand than on how you set and lock the gauge. A wheel that shifts under pressure, a fence that rocks against the work, or a scale that is hard to read can spoil an otherwise accurate tool. Check those details before paying extra for a particular handle material or finish.
As an Amazon Associate we earn from qualifying purchases at no extra cost to you.

Sections
Our Top Picks
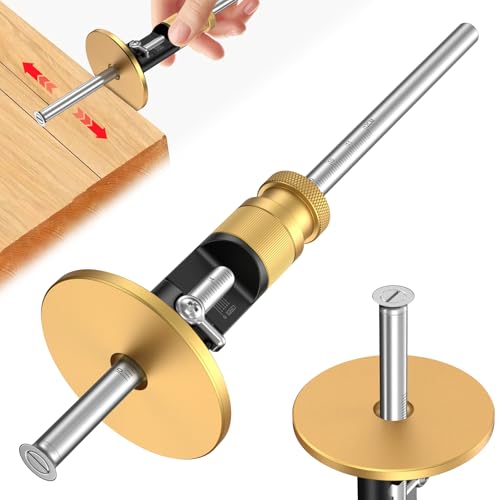 Wheel Marking Gauge Knife Woodworking1 Count (Pack of 1)7.8 x 1.8 x 1.8 Inches0.4 PoundsCheck on Amazon

Wheel marking gauge types compared
| Type | Best for | Trade-off | Typical buying priority |
|---|---|---|---|
| Single-wheel gauge | One line at a time, general joinery | Must reset to mark a second line | Secure lock and comfortable fence |
| Dual-wheel gauge | Marking two edges of a tenon or similar feature | More parts to adjust; can be bulkier | Independent, repeatable wheel adjustment |
| Wheel gauge with micro-adjustment | Fine setup and repeat work | Costs more; adjustment is not a substitute for checking | Positive lock after adjustment |
| Basic wheel gauge | Occasional use and straightforward layout | May need careful setup and frequent checking | Wheel sharpness and low-play fence |
Single wheel or dual wheel?
A single-wheel gauge is the sensible starting point for most people. It is simpler to set, has fewer moving parts, and handles common jobs such as marking a shoulder line or transferring a thickness from one face. If you usually mark one line at a time, a dual-wheel tool adds little value.
A dual-wheel gauge can mark both sides of a tenon without changing the reference setting. Set the wheels to the required spacing, then run the fence along the reference edge. This can save time on repeated joints, but only if the two wheels hold their positions independently and the adjustment is easy to read. On a cheaper dual-wheel tool, check for play before relying on it: a tiny shift can make the tenon too loose or too tight.
For a first gauge, compare a single-wheel marking gauge with a dual-wheel marking gauge only if you regularly lay out paired lines. Otherwise, put the money toward a well-made single-wheel tool and a sharp spare cutter.
What to check before buying
Locking and adjustment: Set the gauge to a chosen distance, tighten it, and try to move the beam by hand. It should not creep. A large knob is easier to tighten than a tiny screw, especially when your hands are dusty, but the lock matters more than its shape. Fine adjustment is useful for dialing in a setting; it is not essential for ordinary work if the beam slides smoothly and locks firmly.
Fence and beam: The fence should sit flat against a straight edge without rocking. A broad fence is easier to control on a wide board, while a compact fence can feel less awkward on narrow stock. Look for a beam that moves without binding but does not wobble. Excess clearance makes a setting less repeatable.
Wheel and depth: The cutting wheel should be sharp, round, and securely attached. A wheel that is loose or nicked can leave a ragged line. A cutting wheel usually makes a narrow score, but it can still tear fragile veneer or bruise a soft edge if you bear down. Check whether the cutter can be replaced or sharpened; availability of replacement parts is more useful than an elaborate finish.
Scale and materials: A graduated beam helps with quick settings, but read it as a guide and verify critical measurements with a rule or calipers. Engraved markings are generally easier to keep legible than shallow printed marks. Wood handles feel warm and are comfortable for long sessions; metal bodies can be compact and durable. Neither material guarantees accuracy.
How to get consistent lines
First, choose a clean reference edge. If it is rough, rounded, or bowed, the gauge will faithfully copy those defects. Set the distance from the fence face to the wheel, then lock the beam. For repeated parts, test the setting on scrap before marking the work.
Hold the fence firmly against the edge and keep the beam roughly square to the face. Pull the gauge toward you in a controlled stroke, using light pressure. One or two passes are usually better than forcing the wheel through the wood. Excess pressure can make the fence lift, wander, or compress a soft edge. On end grain or very hard stock, a shallow first pass followed by a second pass is often cleaner.
For a line that must be visible during cutting, a knife line may be preferable to a deep score. A wheel gauge is especially useful when you need repeated parallel lines, but it does not replace checking the actual fit of a joint.
When a basic gauge is enough
If you mark occasional shelves, tenons, or hinge offsets, a basic single-wheel gauge is often entirely adequate. Spend more when you make frequent repeated setups, need two lines at once, or find that a small adjustment saves meaningful time. A replacement wheel for a marking gauge can also be a practical purchase if the tool you already own has a blunt or damaged cutter.
Before buying, check that the gauge holds a setting, tracks steadily, and has a wheel you can maintain. Those three traits matter more in use than extra scales or decorative materials. If possible, test the fence against a straight board and make a line in scrap; a clean, repeatable score is the result to look for.