What's inside
As an Amazon Associate I earn from qualifying purchases. This post may contain affiliate links at no extra cost to you.
A smoothing plane is useful for the last light cuts on a cabinet door, face frame or length of trim: removing milling marks, leveling a glue line or easing a proud joint without leaving the coarse scratches of a jack plane. The best choice depends less on a premium name than on the size of the work, how much adjustment you want to do, and whether you’re comfortable sharpening.
As an Amazon Associate we earn from qualifying purchases at no extra cost to you.


Sections
Our Top Picks
 Stanley 1-12-004 Smooth Plane Bailey No. 4Smooth Plane 2 Inch9.88 x 5.67 x 2.68 inches4.2 poundsCheck on Amazon
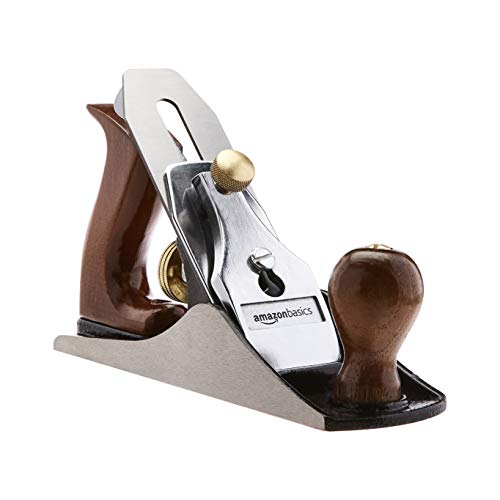 Amazon Basics No.4 Adjustable Precision Smoothing Bench Hand(Pack of 1)10 x 5.5 x 2.6 inches3.82 poundsCheck on Amazon


What a smoothing plane does
A smoothing plane takes thin shavings after the board is already close to flat. It is not a good tool for correcting a twisted door or removing a lot of material from a bowed rail. Those jobs call for a longer plane or a powered planer first. On finished cabinet parts, start with a sharp iron and a fine cut; a thick shaving can leave a hollow, tear out grain or change a carefully fitted edge.
For typical cabinet and trim work, a No. 4-size bench plane is the practical starting point. Its sole is about 9 inches long, short enough to follow modest curves and manageable on narrow parts, while long enough to bridge small surface irregularities. A shorter block plane is handy for end grain and edges, but is less comfortable for smoothing a broad panel.
Options at a glance
| Type | Best use | Trade-off |
|---|---|---|
| Traditional No. 4 bench plane | Cabinet doors, rails, stiles and trim faces | May need setup and sharpening before it cuts well |
| Premium tuned bench plane | Frequent hand work and buyers who want less initial adjustment | Costs more; still needs a sharp edge and careful technique |
| Low-angle block plane | End grain, small edges, hinge or fitting adjustments | Short sole can leave dips on wider faces |
| Cabinet scraper or card scraper | Curly grain and final cleanup where a plane tears out | Requires a properly formed burr and more hand work |
Choosing a bench plane
A well-set-up standard-angle bench plane is the best all-round buy for most people refining doors and trim. Look for a sole that is reasonably flat, a lateral adjustment lever that moves the iron predictably, and a cap iron that seats without a gap. The iron should be thick enough to resist chatter, but sharpness and setup matter more than a heavy body or elaborate finish.
A lower-priced plane can be a sensible choice if you already sharpen tools and are willing to check the sole, flatten the back of the iron and tune the mouth. If you want to spend less time preparing the tool, compare premium No. 4 smoothing planes. Paying more can buy more consistent machining and a better-finished iron, but it cannot compensate for a dull edge or a poor cut direction.
For a first plane, consider a No. 4 bench plane with readily available replacement irons. Check that the handle fits your hand and that the adjustment controls feel usable. An inexpensive plane is fine for occasional projects if it can be tuned; a tool that will not hold its iron securely is not a bargain.
When a block plane is better
For a few inches of end grain, a sharp low-angle block plane is easier to control than a full bench plane. It is also useful for shaving a door edge after a fit check. Choose one with an adjustable mouth if you expect to work figured wood: a tighter opening can help reduce tear-out, though it can clog if the shaving is too thick. Shop low-angle block planes with adjustable mouths if that small-work role matches your needs.
Do not use a block plane to flatten a wide cabinet panel. Its short sole follows local dips, and you may produce a smooth-looking surface that is not flat. Likewise, a smoothing plane is not a substitute for a jointer plane when the goal is a straight, long edge.
Setup and cutting
Before working on the door, check it for loose joints, raised fasteners and grit that could nick the iron. Clamp the part securely on a padded bench. Set the plane iron so it projects only slightly, then take a test shaving from scrap of similar wood. A thin, continuous shaving is a useful starting point; if one side is thicker, adjust the lateral lever until the cut is even across the width.
Plane with the grain where possible. On rails and stiles, grain direction can change near joints, so test a short area before committing to a long pass. Tear-out shows up as small craters or lifted fibers, especially in figured maple, oak with reversing grain and around knots. Reduce the cut, skew the plane slightly, or switch to a scraper. A high cutting angle can help with difficult grain, but it takes more effort and does not fix a dull iron.
For a door edge, mark the high spots with pencil and take controlled strokes, checking the fit often. Removing even 1/32 inch can make a noticeable difference at a tight opening. Keep the plane square to the face unless you deliberately want a small bevel. To avoid rounding the ends of a rail, shorten the final strokes and support the far end as the plane exits.
Sharpening and care
Expect to sharpen during a substantial job, not only when the tool stops cutting entirely. A dull iron needs more force and tends to bruise or tear the surface. A basic sharpening setup can be a pair of flat stones or abrasive sheets on a reliable flat surface; a honing guide helps beginners hold a consistent bevel. A common primary bevel is about 25 degrees, with a small secondary bevel near 30 degrees, though the exact angles are less important than a flat back and a keen edge.
After use, remove dust and wipe the iron and sole dry. Store the plane with the blade backed off so it is not pressing against the bench or sole. These small habits prevent rust and protect the cutting edge—two problems that can ruin the next fine pass faster than any difference between a budget and premium plane.