What's inside
As an Amazon Associate I earn from qualifying purchases. This post may contain affiliate links at no extra cost to you.
A repeated recess is only as consistent as its depth reference. When routing or chopping several pockets for hinges, hardware or inlays, a marking gauge can carry the same setting from one workpiece to the next without relying on a fresh ruler measurement each time. It does not remove the need to check the cut, but it gives you a dependable baseline.
As an Amazon Associate we earn from qualifying purchases at no extra cost to you.


Sections
Our Top Picks
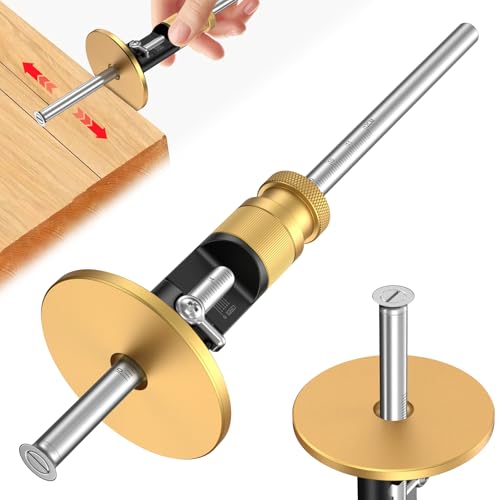 Wheel Marking Gauge Knife Woodworking1 Count (Pack of 1)7.8 x 1.8 x 1.8 Inches0.4 PoundsCheck on Amazon
 ADOEIAK Wheel Marking Gauge with Micro-Adjustment1 Count (Pack of 1)9.52 x 2 x 2 Inches0.2 poundsCheck on Amazon


What a marking gauge can—and cannot—set
A conventional marking gauge sets a line parallel to an edge. For recess work, that line usually marks the boundary or shoulder of the cut, not its depth. A cutting gauge, with a knife instead of a pin, can make a cleaner line across the grain. A mortise gauge adds a second pin for marking parallel lines. These tools are useful for layout, but none directly controls how deep a chisel or router cuts.
For a repeated depth, pair the gauge with a depth reference: a router’s depth stop, a chisel depth gauge, or a simple stop block. Set that reference to the target—say, 3 mm for a shallow hinge leaf—and verify it on scrap. Then use the marking gauge to establish the edges or shoulders consistently. Treating the gauge itself as a depth stop is a common source of confusion and uneven recesses.
Which type to buy
For most general carpentry, a wheel marking gauge is the best all-round choice. Its round cutter rolls through the grain instead of dragging a sharp pin, so it tends to leave a cleaner line on both long grain and end grain. A screw or wedge locks the fence; check that it stays put when you press the cutter against the work.
A cutting gauge is the better pick when a crisp knife line matters, especially for chisel paring. Its blade needs occasional sharpening and careful handling, but it can score a useful boundary that helps limit breakout. A pin-style gauge is cheaper and perfectly adequate for rough layout, especially on softwood or where the line will be hidden. Its pin can follow the grain and wander, so it is less reliable for a fine visible shoulder.
For paired lines, such as a narrow mortise or a strip of consistent width, a mortise gauge saves resetting a single cutter. It is not necessary just to mark one recess edge or a series of identical hinge outlines. If you need to mark parallel lines repeatedly, consider a two-pin mortise gauge; otherwise, a single-cutter tool is simpler and less likely to be bought for a job it will not do.
Gauge types compared
| Type | Best use | Main trade-off | Typical buyer |
|---|---|---|---|
| Pin gauge | Basic layout and rough work | Can follow grain; line is less clean | Occasional user or tight budget |
| Wheel gauge | General marking across and along grain | Wheel must be sharp and securely locked | Most carpenters and DIY users |
| Cutting gauge | Fine shoulders and chisel work | Blade needs sharpening; handle with care | Joinery and clean recess edges |
| Mortise gauge | Two parallel lines at a set spacing | More adjustment than needed for single lines | Repeated mortises or narrow strips |
Features worth paying for
Look for a fence with enough bearing area to sit flat against the stock, a lock you can tighten without shifting the setting, and a cutter that is replaceable or straightforward to sharpen. A readable scale is helpful for rough setup, but do not assume its graduations are accurate enough to define a shallow recess by themselves. For a 3 mm target, a quarter-millimetre error is already noticeable on a thin hinge leaf.
Brass fittings and a hardwood beam can feel better and last longer, but they do not guarantee accuracy. A less expensive tool is fine if its beam is straight, the fence runs square, and the lock holds under firm pressure. Before buying, check for play between beam and fence. A few tenths of a millimetre of movement can turn a repeated setting into several different ones.
A wheel marking gauge is a sensible first purchase if you want one tool for routine edge marking and recess layout. If you already own a sound pin gauge, there is little reason to replace it for hidden, rough work. Spend the difference on a sharper cutter or a reliable depth-setting method.
A repeatable setup for recesses
First, decide what the gauge is marking: the recess boundary, its shoulder, or a reference line from an edge. Set the fence from the same datum on every piece. If the recess is 12 mm from an edge, lock the gauge at 12 mm and mark a test piece. Use a rule or caliper to check the setting rather than trusting a worn scale.
Next, set the actual cutting depth with the tool that controls the cut. On a router, lower the bit to the target and lock the depth stop; on a chisel job, use a depth gauge or a stop block as a visual or physical reference. For a 3 mm recess, test the setting on scrap of matching material, then check the depth at several points. Wood compresses and grain varies, so a single reading is not enough.
Mark with the fence held firmly against the datum edge. Use a light pass first, then a second pass only if needed. Leaning hard on a pin or wheel can make it dive into soft earlywood, while a loose fence can creep during the stroke. After marking the first workpiece, compare the next one against it before cutting the whole batch. That catches a slipped lock before the error is repeated.
Common mistakes and fixes
The most frequent problem is setting a gauge from the wrong edge after flipping a board. Mark the reference edge on every piece, and keep the fence against it throughout layout. Another is expecting a marking line to stop a chisel: it helps define the boundary, but cuts can still run past it. Score the shoulder carefully and pare toward the line in controlled, shallow cuts.
If a line looks ragged, inspect the cutter before changing technique. A blunt pin crushes fibres; a dull wheel or knife can skid, especially across end grain. Sharpen or replace the cutter, then try a light scoring pass. If the fence shifts, clean dust from the beam and lock, tighten the mechanism, and test again. A gauge that will not hold its setting is not a precision tool, regardless of price.
For clean, repeated recesses, the practical combination is a secure wheel or cutting gauge for layout and a separate depth stop for cutting. Buy the simpler pin gauge if your lines are rough or hidden; choose a cutting gauge when the shoulder must be crisp. The right choice is the one that holds its setting and suits the line you need—not the most elaborate tool in the rack.