What's inside
- Best Router Table Plates: Sizes, Insert Rings, and Compatibility
- Compare the main plate formats
- Choose by your table and workload
- Material, thickness, and leveling
- Insert rings: opening size and support
- Check compatibility before ordering
- Quick fit check before purchase
- Ownership: what to inspect over time
- Related Guides
- Best Router Table Plates: Sizes, Insert Rings, and Compatibility
- Compare the main plate formats
- Choose by your table and workload
- Material, thickness, and leveling
- Insert rings: opening size and support
- Check compatibility before ordering
- Quick fit check before purchase
- Ownership: what to inspect over time
- Related Guides
As an Amazon Associate I earn from qualifying purchases. This post may contain affiliate links at no extra cost to you.
Sections
- Best Router Table Plates: Sizes, Insert Rings, and Compatibility
- Compare the main plate formats
- Choose by your table and workload
- Material, thickness, and leveling
- Insert rings: opening size and support
- Check compatibility before ordering
- Quick fit check before purchase
- Ownership: what to inspect over time
- Related Guides
Best Router Table Plates: Sizes, Insert Rings, and Compatibility
The best router table plate is the one that fits your table opening, supports your router or lift, and lets you level the surface without fuss; for most shop-built tables, a roughly 9¼-by-11¾-inch plate with four leveling screws and interchangeable insert rings is a flexible starting point.
Compare the main plate formats
Router table plates are not universally interchangeable. A plate that is close to the opening dimensions may still sit poorly, expose a gap, or leave too little material for its leveling hardware. Measure the opening and check the manufacturer’s drawing before buying—especially for a factory-made table or router lift.
As an Amazon Associate we earn from qualifying purchases at no extra cost to you.

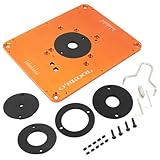


| Plate format | Typical size or fit | Material | Best suited to |
|---|---|---|---|
| Common rectangular plate | About 9¼ × 11¾ in (235 × 298 mm); verify exact dimensions | Phenolic or aluminum | Shop-built tables and compatible router bases or lifts |
| Compact plate | Often around 8¼ × 11¾ in (210 × 298 mm) | Phenolic or aluminum | Smaller tables where a full-size opening is impractical |
| Router-specific plate | Varies by table and router system | Typically metal or engineered laminate | Factory tables with a matching plate pattern |
| Lift-specific plate | Set by the lift manufacturer; some lifts use a plate as part of the assembly | Usually aluminum | Frequent height changes and above-table adjustment |
These are common format examples, not guaranteed standards. A nominal size can differ from the actual plate’s width, length, corner radius, thickness, or mounting-hole locations. Treat the table opening—not the name of the format—as the final authority.
Choose by your table and workload
- Building a table from scratch: Choose the plate first, then cut the opening to its published dimensions. A plate with leveling screws and a replaceable center ring makes later setup and bit changes easier.
- Replacing a plate in a manufactured table: Match the exact plate or confirm all dimensions, corner profiles, thickness, and screw locations. If the original plate is still available, use it as a template, but verify its dimensions rather than assuming it has not been modified.
- Using a router lift: Buy a plate and lift designed to work together. Check the lift’s opening, mounting pattern, plate thickness, and router compatibility; a plate that fits the tabletop may not accept the lift.
- Occasional hobby use: A flat phenolic plate can be a sensible, lower-cost option if its load rating and router mounting suit your setup.
- Frequent bit changes or production work: Consider an aluminum plate or lift-compatible system for rigidity and convenient adjustment. Confirm that the added thickness will not interfere with the fence, insert rings, or above-table hardware.
As a general market guide, a basic plate often costs in the tens of dollars, while precision-machined plates and lift systems can cost substantially more—sometimes into the low hundreds for a lift. Compare the full setup cost, including rings and any adapter or mounting hardware, rather than the plate alone.
Material, thickness, and leveling
Phenolic
Phenolic plates are made from resin-impregnated material and are generally stiff, smooth, and resistant to ordinary shop wear. They can be a good value, but a damaged or stripped mounting hole may be less straightforward to repair than a metal one. Keep the plate supported, avoid overtightening screws, and check for warping if the router is unusually heavy.
Aluminum
Aluminum plates offer a rigid mounting surface and durable threaded features, depending on the design. They may cost more and can show scratches or pick up burrs around openings if handled carelessly. A burr or raised screw head can snag stock, so inspect the working surface after setup and maintenance.
Leveling hardware matters as much as the material
Look for leveling screws near the corners or edges, plus a way to secure the plate once it is flush. A plate can be strong yet frustrating if it rocks or sits proud of the tabletop. After installation, place a straightedge across the table and plate in several directions. Adjust the screws in small increments until the surfaces are even, then lock the plate if the design provides locking screws.
Insert rings: opening size and support
Insert rings reduce the gap around the bit. Most systems use one or more removable rings with different center openings; some also accept blank rings that you can bore to suit a particular cutter. Check the ring’s outside diameter and locking method as well as its center hole: rings from one plate system are not necessarily compatible with another, even when their openings look similar.
Choose an opening that clears the cutter while leaving as little unsupported space around it as practical. The clearance must account for the cutter’s widest point and any runout, not just the bit shank. For a large bit or raised-panel cutter, use an appropriately large opening and follow the cutter manufacturer’s operating instructions. Never let a ring touch a rotating bit.
Before switching rings, disconnect power, remove the bit or lower it clear, and make sure the ring is fully seated and flush. A ring that rocks or sits above the plate can catch workpieces. Keep a dedicated ring for frequently used bits when repeatable setup matters.
Check compatibility before ordering
For a router base, confirm the mounting-hole pattern, screw size, and whether the plate needs a model-specific adapter. Router manufacturers may offer more than one fixed base or mounting pattern, and a plate described as “universal” still needs to match the router’s actual base.
For a lift, confirm the lift model’s plate dimensions and router-clamping range. Some lifts are designed around particular router motor diameters; others accept a broader range. Do not infer compatibility from the router’s horsepower alone. Also verify that the lift can pass through the tabletop opening and that its adjustment mechanism remains accessible after installation.
Finally, compare plate thickness with the table recess. If the plate is too thick, it can sit proud; if it is too thin, it may require shimming or a deeper recess. Check whether the product includes mounting screws, rings, and leveling hardware, since these are often separate items.
Quick fit check before purchase
- Measure the opening: Record width, length, corner radius, and recess depth at more than one point. A slightly out-of-square opening can make a nominally correct plate bind.
- Measure the plate: Compare its actual outside dimensions and thickness with the opening and recess. Leave only the clearance specified by the manufacturer.
- Check mounting: Match the router-base or lift pattern, screw locations, and any adapter requirements.
- Plan the bit openings: Confirm the ring system has a suitable opening for your largest regular cutter, or supports a blank ring if you need a custom opening.
- Level and test: With the router unplugged, install the plate, adjust it flush, and check for rocking, gaps, and snags using a straightedge and a scrap board.
Small alignment errors become noticeable when long stock crosses the plate, so taking time to level it is worthwhile. Recheck the surface after moving the table or changing the mounting hardware.
Ownership: what to inspect over time
Dust and resin can build up around ring seats and leveling screws, preventing a ring from sitting flat or making adjustments difficult. Unplug the router before cleaning; use a dry brush or cloth, and avoid solvents unless the plate maker says they are safe. Check periodically for loose fasteners, stripped threads, a cracked ring, or a plate that has shifted in its recess. Replace damaged rings rather than trying to stabilize them with tape or loose shims.
For most woodworkers, a well-fitting plate with reliable leveling hardware and a ring system that matches their cutters is a better choice than the most elaborate material or the broadest “universal” claim. If you are unsure, prioritize an exact fit for your table and router, then upgrade to a lift or more specialized plate when your work makes above-table adjustment or frequent bit changes worth the cost.