What's inside
As an Amazon Associate I earn from qualifying purchases. This post may contain affiliate links at no extra cost to you.
A marking gauge and a cutting gauge both transfer a measured distance from an edge. The difference is at the business end: a marking gauge uses a pin to scratch a fine line, while a cutting gauge uses a small knife to sever the surface fibres. That distinction matters when laying out shoulders, tenons and other joints where a ragged line can show or interfere with a clean fit.
As an Amazon Associate we earn from qualifying purchases at no extra cost to you.

Sections
Our Top Picks
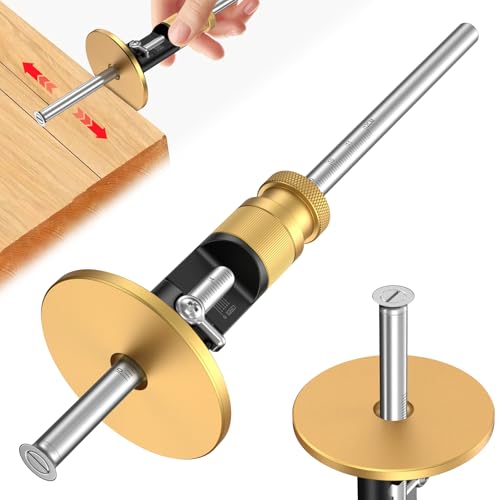 Wheel Marking Gauge Knife Woodworking1 Count (Pack of 1)7.8 x 1.8 x 1.8 Inches0.4 PoundsCheck on Amazon
 ADOEIAK Wheel Marking Gauge with Micro-Adjustment1 Count (Pack of 1)9.52 x 2 x 2 Inches0.2 poundsCheck on Amazon

How the two gauges work
A traditional marking gauge has a beam, a fence that slides along it, and a pointed pin. Hold the fence against a board’s edge and draw the gauge along the face. The pin scores a line parallel to that edge. It is quick to set and works well for general dimensioning, such as marking a board to thickness or locating a groove.
A cutting gauge has the same basic beam-and-fence arrangement, but its cutter is a small blade. It slices the fibres rather than pushing a sharp point through them. A knife line is usually cleaner across the grain and gives a chisel or saw a clear boundary to register against. The blade needs more care: a dull or poorly set cutter can tear fibres, wander, or leave a line too wide to read accurately.
Some gauges use a wheel cutter instead of a straight blade. Wheel cutters roll more consistently and are less likely to follow the grain, but they can leave a wider line than a well-sharpened knife. For fine joinery, a narrow, sharp cutter is often the better choice.
Marking gauge vs. cutting gauge
| Feature | Marking gauge | Cutting gauge |
|---|---|---|
| Mark | Scratched line from a pin | Cut line from a blade or wheel |
| Best use | General layout and rougher work | Joinery lines, especially across the grain |
| Surface damage | Can bruise or tear fibres | Usually leaves a crisp, clean boundary |
| Maintenance | Keep the pin sharp and correctly positioned | Keep the cutter sharp; replace or hone it as needed |
| Cost and convenience | Generally cheaper and simpler | Often costs more and requires more blade care |
Which gauge should you buy?
If you make furniture or regularly cut mortise-and-tenon joints, a cutting gauge is the more useful first choice. A knife line across the grain helps prevent the shoulder fibres from breaking out when you pare to the line. It also gives a chisel a small edge to register against. Look for a gauge with a secure fence lock, a cutter that can be sharpened or replaced, and a beam long enough for your stock. A woodworking cutting gauge is worth considering if clean joinery layout is a regular part of your work.
A standard marking gauge is still a sensible buy for shop work, rough stock preparation, and tasks where a scratched line is adequate. It is usually less expensive, and a simple pin is easy to sharpen. If your projects are mostly shelves, utility boxes or construction work, paying extra for a cutting gauge may not improve the result enough to justify it. A basic marking gauge handles many everyday layout jobs.
You do not necessarily need both. If you do, a marking gauge is handy for general work and a cutting gauge for visible joinery. A combination marking gauge with both a pin and a cutter can save space, but check how securely each marking point locks into position; a loose cutter defeats the point of accurate layout.
Setting and using a gauge accurately
Set the gauge from a rule or, better, from the actual mating part when the joint depends on a close fit. Slide the fence to the required distance, then lock it firmly. On many hand-cut joints, even a small error matters: a shoulder line that is 0.5 mm out can leave a visible gap or make a tenon too short. Test the setting on scrap from the same board before marking the workpiece.
Keep the fence flat against the edge throughout the stroke. Tilt it and the line will drift, even if the setting is correct. Use light, steady pressure rather than forcing the pin or blade into the wood. One or two controlled passes are usually better than repeatedly tracing the line. For a cutting gauge, place the cutter so its bevel faces the waste side; this helps keep the clean edge on the piece you intend to retain.
Grain direction affects both tools. A pin can follow the grain and wander away from the intended path, particularly in open-grained wood. A cutting blade can also be pulled off course if it is blunt or pressed too hard. If a line crosses difficult grain, make a shallow first pass, then deepen it with a second. Do not try to force a deep line in one stroke.
Common mistakes and useful limits
A gauge measures from the edge it rides against; it does not correct a crooked or damaged reference edge. Plane the edge straight and square first, or the line will faithfully copy its flaws. Likewise, a gauge is not a substitute for checking that two mating parts share the same reference face. Mark both parts from a common face or from one another to avoid small measuring differences stacking up.
Do not treat a gauge line as a saw trench. A deep cut can weaken a thin part or leave a dark mark that sanding will not remove. For a tenon shoulder, use the knife line as a boundary, saw close to it, and pare carefully to the line. On fragile veneer or very soft wood, test the cutter first; a sharp blade can still lift a thin surface layer if used aggressively.
Finally, protect the cutter when the gauge is stored and check its sharpness before fine work. If it crushes fibres rather than slicing them, hone or replace it. The cheaper pin gauge remains perfectly adequate where a clean knife edge is unnecessary; choose the cutting gauge for the jobs where the line itself helps control the cut.