What's inside
As an Amazon Associate I earn from qualifying purchases. This post may contain affiliate links at no extra cost to you.
Sections
Our Top Picks
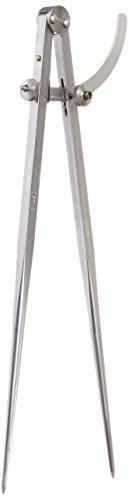 C.S.Osborne 106-12 Wing Divider with Maximum Opening 12"6 x 15.1 x 1.2 inches0.19 poundsCheck on Amazon

What the two dividers are for
Compass dividers and wing dividers both transfer measurements and mark arcs, but they hold their settings differently. A compass divider has two legs joined at a pivot. A wing divider adds a metal bar and adjustment screw that brace the legs apart. That extra hardware makes the setting less likely to shift when you work, but it also adds cost and bulk.
For occasional layout—such as marking a curve on a cabinet part or stepping off a few equal spaces—a basic compass-style pair is usually enough. For repeated work, fine adjustments, or scribing directly against wood grain, wing dividers are easier to control.
As an Amazon Associate we earn from qualifying purchases at no extra cost to you.


Quick comparison
| Feature | Compass dividers | Wing dividers |
|---|---|---|
| Setting | Spread or close the legs by hand | Adjust legs with a screw; brace holds the setting |
| Best suited to | Occasional arcs and rough transfer | Repeated spacing and controlled scribing |
| Adjustment speed | Fast for broad changes | Slower for large changes, precise for small ones |
| Setting stability | Can slip if bumped or pressed hard | Generally holds better under moderate pressure |
| Cost and upkeep | Usually cheaper and simpler | Usually costs more; screw and bar need to stay clean |
How they behave on a workpiece
To mark a circle, set the point spacing to the required radius, anchor one point, and sweep the other around it. To transfer a measurement, set the points against the reference, then carry that opening to the new location. The tool does not read a scale for you: accuracy depends on keeping the points seated and avoiding a change in leg spacing.
On a plain compass divider, the friction at the pivot holds the legs. That is convenient for quick work, but repeated pressure can close or open the legs slightly. A wing divider’s screw lets you nudge the opening in small increments, and its brace resists accidental movement. Neither design fixes poor technique: leaning hard on a point can skate across the surface, widen a hole, or gouge a finished face.
For clean layout, make a light first pass rather than forcing the points into the wood. On hard maple or oak, a sharp point will usually mark with modest pressure. On soft pine, heavy pressure can tear fibers and leave a ragged line. If the line must guide a saw or chisel, use a marking knife for the final edge and treat the divider mark as a guide.
Which type should you buy?
Choose compass dividers if you need a low-cost tool for occasional jobs: laying out a rounded corner, marking a rough arc, or transferring a width once in a while. A simple pair is also reasonable for a tool belt or site kit where it may get scratched or lost. Check that the pivot moves smoothly and that both points meet without a noticeable sideways wobble. A bargain tool with a loose joint can be more frustrating than a basic, well-made one.
Choose wing dividers if you often repeat a dimension, mark parallel offsets, or need to preserve one setting while making several marks. Cabinetmakers, stair workers, and furniture makers may adjust the opening many times in a day; the screw makes those small corrections less fiddly. Look for a firm adjustment with no gritty spots, a brace that does not bow, and legs that meet at their tips.
For a first purchase, a mid-size pair is more useful than an unusually tiny or long tool. A divider with roughly 6-inch legs is a practical general-purpose size for furniture and trim layout. Smaller tools suit fine work in tight spaces; longer ones reach larger arcs but are less convenient to carry and can flex more if lightly built. Check the maker’s stated capacity before buying, since maximum spread varies by design.
Browse wing dividers for carpentry if you want the screw-adjustment style, or compare basic compass dividers for woodworking for a simpler, cheaper option. Avoid paying extra for fine graduations or decorative finishes if you will set the tool from a ruler or an existing part.
Getting repeatable results
Start by setting the divider against a rule or marking gauge, then test the opening on scrap. For a 25 mm transfer, make a short test mark and measure it before laying out the actual part. If the points are dull, the mark may wander; if they are too sharp or you press too hard, they can dig in and enlarge the reference point. Keep the legs perpendicular to the surface while marking.
When stepping off equal distances, keep one point in the last prick mark and swing the other forward without lifting the tool more than necessary. A common error is letting the pivot drift sideways, which compounds over several steps. For a run of 10 intervals, even a small error of 0.5 mm at each step can leave the final point several millimeters out. Check the overall span against a rule before cutting.
On a wing divider, tighten the adjustment only enough to hold the opening. Overtightening can make fine changes jumpy and put unnecessary strain on the screw. On a friction-joint compass divider, avoid using the legs as a lever or forcing them against a hard edge; reset and recheck the opening after a bump.
Care and limits
Keep the joint and screw free of sawdust, glue, and grit. Wipe the points after use and store them closed or with a point guard so they do not damage a pouch or cut your hand. A little dry lubricant may help a stiff adjustment screw, but oil can collect dust, so use it sparingly.
Dividers are layout tools, not measuring instruments. They transfer a distance well when handled carefully, but they do not tell you whether the distance is 32 mm or 1¼ inches. Use a rule, caliper, or story stick to establish the first setting, and verify critical dimensions before machining. For rough framing marks or a single curve, the cheaper compass divider is often entirely adequate. The wing style earns its price when keeping a setting steady and making controlled adjustments saves time across many repeated marks.