What's inside
As an Amazon Associate I earn from qualifying purchases. This post may contain affiliate links at no extra cost to you.
A combination square and a sliding bevel can both help mark a mitre, but they do different jobs. A combination square is good for checking or transferring a fixed 45-degree angle. A sliding bevel copies an angle and holds it so you can transfer it to a workpiece. For an ordinary 45-degree cut, either can work; for a mitre that has to match an existing corner, the bevel is usually the more useful tool.
As an Amazon Associate we earn from qualifying purchases at no extra cost to you.



Sections
Our Top Picks
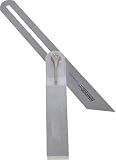
 Johnson Level & Tool 1913-1000 Professional Aluminum T-Bevel10 Inch0.75 x 3.75 x 13.13 inches0.02 poundsCheck on Amazon


What each tool does
A combination square has a stock that registers against an edge and a ruler that slides through it. Many have a 45-degree face on the stock, letting you mark a standard mitre without setting an angle. Check that the ruler is seated firmly and the stock’s edge is straight; a loose or damaged stock can throw off the line.
A sliding bevel has a handle and a pivoting blade. Loosen its wing nut or locking screw, set the blade to an angle, then tighten it to preserve that setting. It does not tell you the angle in degrees. Instead, it transfers an angle from a sample, a corner, or another tool. For a basic mitre, set the blade to 45 degrees using a reliable reference, or copy the angle directly from the joint.
Quick comparison
| Task or feature | Combination square | Sliding bevel |
|---|---|---|
| Marking a standard 45-degree mitre | Fast, if its 45-degree face is accurate | Works, but needs an angle reference |
| Copying an unusual corner angle | Limited; requires another way to set the angle | Designed for this job |
| Registering on a straight board edge | Stock provides a firm reference | Handle can register, but may be less convenient |
| Checking a mark at a measured angle | Useful when the angle is built into the tool | Transfers angles but does not measure them |
| Common failure | Assuming the built-in 45 is accurate | Blade slipping after the lock is tightened |
Choose by the job
For picture frames, small trim returns, or another repeatable 45-degree cut, a combination square is usually quicker. Put the stock against the workpiece edge and draw along the 45-degree face. It is especially handy when marking several pieces from the same straight edge. A basic, well-made combination square with a 45-degree face is enough for occasional trim work; a more expensive tool is not automatically more accurate.
For trim meeting a wall or an existing frame, do not assume the corner is exactly 90 degrees. A small error becomes visible at the joint: two pieces cut at 45 degrees may leave a gap if the actual corner is open or closed. Use a sliding bevel to copy the corner angle, then transfer the setting to each piece. A sliding bevel gauge is also useful for matching an existing bevel or marking a repeated nonstandard angle.
If you need both functions often, there is no reason to force one tool to replace the other. The square handles common reference angles and edge layout; the bevel handles copying. For occasional DIY work, however, a square plus a careful test fit may cover most standard mitres, while the cheaper bevel is worthwhile when you regularly work around out-of-square walls.
How to mark a mitre accurately
First choose a reference face and edge. Mark the face that will show after installation, and keep the tool registered against the same edge for every measurement. On a combination square, place the stock tight against that edge and draw the line in one steady stroke. A sharp pencil or marking knife gives a more precise cut line than a thick carpenter’s pencil, particularly on narrow trim.
With a sliding bevel, copy the corner by placing the handle against one side and moving the blade to the other. Tighten the lock, lift the tool away, and check that the blade has not shifted. Transfer the setting to the workpiece with the handle against its reference edge. If the corner is wide, a bevel gauge can be awkward to hold across it; use a larger reference or make a test fit rather than stretching the blade at an unstable angle.
For a symmetrical mitre joint, the cut angle on each piece is half the included corner angle. A square corner is 90 degrees, so each cut is 45 degrees. If the actual corner is 94 degrees, each piece needs 47 degrees for a symmetrical joint. In practice, a bevel gauge copies the full corner; you still need to divide the angle or adjust the tool setting to mark each half. A marked-up scrap and a test cut are safer than relying on mental arithmetic alone.
Check the tool and the cut
Before using a combination square’s 45-degree face for a visible joint, test it on scrap. Mark a line, flip the square over, and mark again from the same starting point. If the lines diverge, the tool or your registration is off. You can also cut two scraps and bring their mitred edges together. A small mismatch at the tips is easier to spot before cutting expensive moulding.
On a sliding bevel, the main risk is a loose lock. Set the angle, tighten the fastener, then press lightly on the blade to see whether it moves. Avoid overtightening a small wing nut with pliers; that can damage the screw or make adjustments awkward. A model with a positive, firm lock is preferable if you transfer angles repeatedly, but a simple bevel is fine for occasional use.
Neither tool compensates for a poor saw cut, a twisted board, or inconsistent setup. Mark on a stable surface, keep the stock or handle against the same edge, and cut just to the waste side of the line. If the mitre will be visible, leave the line intact and trim to it with a sharp saw or plane as needed. The best choice is the one that matches the angle you actually have: a square for a known 45 degrees, a bevel for copying the corner in front of you.