What's inside
As an Amazon Associate I earn from qualifying purchases. This post may contain affiliate links at no extra cost to you.
A half-lap looks simple until the two pieces need to sit flush. The cleanup work is mostly about flattening the bottom of each recess and squaring its shoulders without widening the fit. A sharp chisel matters more than an expensive one, but blade width, bevel shape and handle strength affect how controlled that work feels.
As an Amazon Associate we earn from qualifying purchases at no extra cost to you.



Sections
Our Top Picks
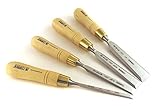
 Narex Czech Steel Premium 4 pc Set True1/4", 1/2", 3/4", 1"6.38 x 13.5 x 1.5 inches1.63 poundsCheck on Amazon
 Narex Czech Steel Premium 4 pc Set 8Medium to Large6.37 x 13.5 x 1.5 inches1.63 poundsCheck on Amazon


What the job needs
For a typical half-lap in stock ¾ inch thick, a ¾-inch chisel can pare most of the floor, while a ¼- or ⅜-inch chisel reaches corners and removes narrow ridges. If you buy only one, choose a ½-inch bench chisel: it is narrow enough to control and wide enough to make useful progress. A broad 1-inch chisel is handy on larger joints, but awkward for tight shoulders.
Bench chisels are the practical default. Their bevel lets the blade reach into a recess, and they are light enough for hand pressure or gentle mallet taps. A paring chisel is longer and useful for controlled trimming, but it is not a substitute for a mallet-driven bench chisel when removing more than thin shavings.
Chisel types compared
| Type | Best use on a half-lap | Trade-off |
|---|---|---|
| Bench chisel | General cleanup, shoulder trimming and moderate chopping | Most versatile choice; handle and edge need routine care |
| Paring chisel | Fine, hand-pressure cuts across the floor | Long blade gives control, but is easier to damage with a mallet |
| Mortise chisel | Heavy chopping in deep, narrow recesses | Strong but bulky; usually unnecessary for shallow laps |
| Bevel-edge chisel set | Buying useful widths for general joinery | Good value if the edges arrive usable; check sharpening needs |
What to buy
For occasional furniture or repair work, a modest-quality bevel-edge bench chisel set is often enough. Look for common widths—¼, ½, ¾ and 1 inch—and a handle that can take light mallet use. A set gives you a narrow tool for corners and a wider one for the floor. The catch is that budget edges may need flattening and sharpening before they cut cleanly; do not assume a new chisel is ready to use.
If you already own a few chisels, add a single ¾-inch bench chisel only when that width matches your usual work. For larger laps or wide boards, a 1-inch chisel saves strokes. For small stock, a ½-inch blade is easier to steer. Buying every width is unnecessary if you make this joint only now and then.
Handle construction matters more than polished details. A wood handle is comfortable and repairable, but repeated hard blows can split a weak one. A durable synthetic handle tolerates mallet work well, though some feel less comfortable in the hand. Avoid striking a paring chisel with a steel hammer; use hand pressure or a light wooden mallet. For routine chopping, pair a bench chisel with a wooden woodworking mallet.
Cleaning the joint without overshooting
Mark the depth and shoulders with a sharp knife or marking gauge before cutting. Saw or chop the bulk waste in short steps, stopping about 1–2 mm above the final floor. If you drive the chisel straight to depth in one heavy cut, the waste can split below the line, especially in softwood or near the end of a board. A shallow reference cut at the perimeter helps prevent that breakout.
Remove the remaining ridges with the bevel facing up and the flat back kept close to the floor. Take thin shavings, working from both ends toward the middle where possible. For a stubborn high spot, pare across the grain in controlled passes rather than levering up a large chip. Use a narrow chisel to reach inside corners, but keep its cutting edge inside the layout line; a small nick in a shoulder can leave a visible gap in the assembled joint.
Check the fit with the mating piece, not just a ruler. It should seat with firm hand pressure and show no rocking. If it stops early, identify the high spot with pencil or chalk transfer rather than removing material at random. A lap that is too deep cannot be corrected by more chiseling; the pieces will sit below flush.
Edge care and common failures
A dull chisel crushes fibers and encourages you to use more force, which makes slipping and overcutting more likely. Before joint work, hone the bevel and remove the wire edge from the back. For ordinary bench work, a consistent bevel around 25–30 degrees is a useful starting range; the exact angle matters less than a sharp, supported edge. Keep the back flat near the cutting edge—rounding it makes accurate paring harder.
Do not use a chisel as a pry bar. Levering out thick waste can chip the edge or split the handle, and prying against a finished shoulder can damage the joint. Chop waste in small sections, then pare the floor. If the edge catches grain and tears below the surface, reverse direction, reduce the cut, or score the boundary more deeply.
For one-off household work, a serviceable inexpensive bench chisel that you sharpen properly is a sensible buy. Spend more when you use chisels often, need reliable edges across several widths, or want a handle built for regular mallet work. In either case, a sharp ½- or ¾-inch bench chisel and careful layout will usually do more for a clean half-lap than a large, costly set.