What's inside
- Best 110 Volt Stick Welders for Home and Portable Repairs
- Shortlist by repair situation
- What a household-circuit stick welder can really do
- Comparison: output, circuit, and portability
- Choose by your outlet and work pattern
- Breaker demands and setup details that change the result
- Duty cycle, thickness, and ownership costs
- Bottom line
- Best 110 Volt Stick Welders for Home and Portable Repairs
- Shortlist by repair situation
- What a household-circuit stick welder can really do
- Comparison: output, circuit, and portability
- Choose by your outlet and work pattern
- Breaker demands and setup details that change the result
- Duty cycle, thickness, and ownership costs
- Bottom line
As an Amazon Associate I earn from qualifying purchases. This post may contain affiliate links at no extra cost to you.
Sections
- Best 110 Volt Stick Welders for Home and Portable Repairs
- Shortlist by repair situation
- What a household-circuit stick welder can really do
- Comparison: output, circuit, and portability
- Choose by your outlet and work pattern
- Breaker demands and setup details that change the result
- Duty cycle, thickness, and ownership costs
- Bottom line
Best 110 Volt Stick Welders for Home and Portable Repairs
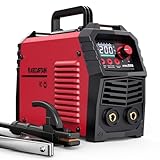
The best 110 volt stick welder for most home repairs is a 120V inverter that can deliver roughly 80–90 amps on a household circuit, run 1/16- or 3/32-inch electrodes, and has a published duty cycle at the current you plan to use. For occasional thin-steel repairs, the YESWELDER ARC-125DS is a compact option; for a more capable machine with both 120V and 240V input, consider the Lincoln Electric POWER MIG 211i only if you need its broader process and voltage flexibility. A 120V-only stick machine is the simpler choice when portability and price matter more than maximum output.
“110 volt” is commonly used to describe equipment intended for North American household power, which is nominally 120V. Actual welding output depends on the outlet circuit, extension cord, input voltage, and the machine’s duty cycle—not just the model’s advertised maximum amperage. The picks below are best understood as options for light repair work, not substitutes for a 240V welder when you need sustained high output or heavy structural welds.
As an Amazon Associate we earn from qualifying purchases at no extra cost to you.



Shortlist by repair situation
- Occasional repairs and easiest carrying: YESWELDER ARC-125DS. A small inverter for light work; confirm the current manual’s input and duty-cycle specifications before buying.
- Mostly 3/32-inch electrodes on household power: Choose a 120V inverter with a clearly stated 80–90A output and a duty cycle listed at that output. This matters more than a headline maximum number.
- Frequent welding, thicker stock, or longer beads: Step up to a dual-voltage machine and a suitable 240V circuit. A 120V-only stick welder will otherwise spend more time cooling and may not provide adequate penetration.
- Very thin sheet metal: Stick welding is usually the wrong process. Its arc and electrode are difficult to control on thin sheet; consider a suitable MIG setup or a qualified repair method instead.
What a household-circuit stick welder can really do
Most 120V stick welders are best suited to mild-steel brackets, small repairs, and short welds on stock around 1/8 inch thick, provided the joint is prepared well and the machine can sustain the selected electrode. Thicker material may be weldable with a properly designed joint and multiple passes, but the result depends on fit-up, electrode, operator skill, and heat input. Do not treat a machine’s maximum amperage as a guarantee of reliable single-pass welding on a particular thickness.
For a practical starting point, 1/16-inch electrodes need less current and are useful on lighter work; 3/32-inch electrodes are the more versatile size for many small repairs. A 1/8-inch electrode often asks more of a 120V machine than its circuit or duty cycle can comfortably provide. Check the electrode maker’s amperage range and the welder manual rather than relying on a general rule.
Comparison: output, circuit, and portability
| Machine or class | Input and output to verify | Practical electrode choice | Best fit | Key limitation |
|---|---|---|---|---|
| YESWELDER ARC-125DS | 120V-class inverter; verify the exact output range and duty cycle for the version sold | Typically light-duty 1/16- and 3/32-inch work, subject to manual | Portable, occasional household repairs | Do not assume its maximum rating is sustainable on a standard outlet |
| Other 120V-only inverter, 80–90A usable output | 120V input; check required input current and duty cycle at 80–90A | 3/32-inch for general light repair; 1/16-inch for lighter stock | Budget-conscious home use | Limited reserve for larger electrodes and longer welds |
| Dual-voltage inverter, such as the ESAB Rogue ES 180i | Supports 120V and 230V input; output and duty cycle differ by input | More flexibility; follow the manual’s voltage-specific electrode guidance | Portable work now, with a path to a 240V circuit | On 120V, it remains constrained by household power |
| 120V household branch circuit | Commonly 15A or 20A; circuit rating is not the same as welder output amperage | Use only the electrode and setting the welder can support continuously | Short runs and light repairs | Other loads, long cords, and low voltage can cause nuisance trips or poor arc performance |
Specifications vary by model revision and market, so the table intentionally distinguishes a machine class from a guaranteed rating. Before purchase, look for the input-current requirement, duty cycle at a stated output, electrode recommendations, and whether the machine’s output claims apply on 120V or only on 230V. Weight is also worth checking in the current listing: small inverter welders are commonly portable enough for one-person transport, but leads, helmet, gloves, and electrodes add substantial carried weight.
Choose by your outlet and work pattern
| Your situation | Better choice | Why |
|---|---|---|
| One or two short repairs a year; limited storage | Compact 120V inverter | Low carrying and storage burden; modest output is usually enough for small repairs |
| New welder learning on mild-steel practice pieces | 120V machine with clear controls and published duty-cycle data | Simple setup, but practice on scrap before working on a part that must hold a load |
| Regular repairs or longer beads | Dual-voltage inverter, preferably used on a properly installed 240V circuit when needed | More headroom and less reliance on the limits of a household outlet |
| Thin sheet, vehicle body panels, or neat long seams | Consider MIG or a suitable specialist process | Stick’s concentrated heat and electrode handling make thin material easier to burn through |
Breaker demands and setup details that change the result
A 110 stick welder does not draw 110 amps from the outlet. It draws input current at household voltage to produce much higher current at low welding voltage. Check the machine’s rated input current and the outlet circuit rating. A 15A circuit may restrict usable output compared with a dedicated 20A circuit, and a shared circuit can trip when other appliances are running. Never replace a breaker with a larger one to stop trips; the wiring must be rated for the protection installed.
Use a properly grounded outlet and a short, heavy-gauge extension cord only when the manufacturer permits it. A long or undersized cord causes voltage drop, which can make the arc unstable and increase heating in the cord. Keep the work clamp attached to clean, bare metal close to the weld, remove paint and rust from the joint, and secure the work so it cannot move. Wear a welding helmet with an appropriate shade, gloves, and flame-resistant clothing; keep sparks away from fuel, dry debris, and other fire hazards.
Duty cycle, thickness, and ownership costs
Duty cycle is the portion of a stated time interval a welder can operate at a particular output before it needs to cool. For example, a 20% duty cycle over a 10-minute rating period means up to two minutes of welding followed by cooling time at that rated condition. The percentage can rise at lower amperage, so compare figures only when the output and rating period match. Short repair beads may suit a modest duty cycle; repeated long beads may not.
Electrodes and surface preparation often determine whether a small machine feels capable. Keep rods dry according to their packaging, remove scale and coatings where appropriate, and use fresh, correctly sized electrodes. Chipped electrode coatings, dirty clamps, worn leads, and loose connections are common causes of poor starts or an erratic arc. Inspect cables and the electrode holder regularly, and stop using damaged insulation or overheated connectors.
For a rough ownership calculation, suppose a repair uses six 3/32-inch electrodes at a general market cost of about $0.10–$0.30 each. The rod cost is roughly $0.60–$1.80, before wasted starts, grinding discs, and protective equipment. The welder’s purchase price matters more when it will sit unused: for only a few small jobs, borrowing or renting may cost less than buying a machine and a complete safety setup.
Bottom line
For the best 110 volt stick welder, prioritize a credible 120V output rating and duty-cycle figure over the biggest number printed on the case. A compact 120V inverter such as the YESWELDER ARC-125DS can suit occasional light repairs, while a dual-voltage model such as the ESAB Rogue ES 180i makes more sense if you expect to use 230V power later. If your work involves thick steel, long welds, or safety-critical structures, choose a machine and process sized for the job—and have critical welds assessed by a qualified professional.